A bag of beans

A while ago I saw a great tutorial from Project Nursery.com via Plush Addict’s Facebook page on making a beanbag.

bean-bag-graphic-2

The instructions were very easy to follow, but despite it saying it could be made in 30 minutes, it took me a wee bit longer than that. Like maybe closer to two hours. This is probably down to the fact I had to measure out my fabric, trim it to size, iron it, lay it out on my kitchen floor, pin it up, trim it again as somehow one piece was bigger than the other before I could get on with any sewing.

I decided to go for a non-heavyweight fabric, I may end up regretting that, but I’ve been sure to make sure I secure my seams pretty well and my stepson has been advised that as it’s been lovingly made by yours truly, that it would be nice if he didn’t constantly throw himself on it.

I picked Passing Clouds in Gold by Elouise Renouf for the Bark & Branch collection of Cloud 9 fabrics. I love this design with the bold black lines and the gold yellow tones. I went for a matching Kona Solid in Yarrow. I got the clouds fabric from one of my favourite online fabric shops The Eternal Maker.

CloudsYarrow

I dutifully followed the instructions, sewing up the two long sides first, folding over, cutting my curve and sewing that, and then came the bit I was a dreading. The zip. I’ve never done a zip before, ever. I’d had to look at the picture a few times to get it into my head what to do. I sent the link to the tutorial to my Mum so we could talk about it. She was all “Oh yes, it should be pretty straightforward, make sure you pin it in right sides together. Practice first with the other zip you bought a while ago.” I had bought a zip a couple of weeks ago, thinking about perhaps having a go at something with a zip. In the end I just went for it, I made sure I pinned it in, then tacked it in and took it to the machine and put my zipper foot on. Then I had no idea which way I should sew it, which side of the zip should be against what part of the foot? In the end I did a line of stitching both ways, at least it will make it a bit more secure! I also then realised how to finish it off from each side making sure none of the ends of the zip were showing on the right side of the fabric and stitched across the ends to ensure the fastener would stop and there would be no escaping beans!

The tutorial said to use 3.5 cubic feet of bean bag fill. I had bought 4 cubic feet thinking that I could top it up when required, but it turned out I needed more than that as it was looking a bit flat and sad, so I ordered another 4 cubic feet with a view to having plenty left over to use for top ups! I used probably just under half of it to finish it off.

Beanbag 1Beanbag 3Beanbag 4Beanbag 2

I am quite pleased with it, pleased I didn’t totally mess up on the zip and pleased that it looks vaguely like the picture, but most of all, pleased that my stepson likes it. When I told him I had made it he said ‘It’s very nice.’ Later that afternoon he spent several minutes jumping on it and then squirming about in it before eventually settling down and using it to sit in while playing on the XBox. Looks rather comfy!

Beanbag Customer


Pleased as punch!

Earlier in June I hosted a giveaway on my Facebook page and had a little blog post about it too. Dashwood Studio had a new range of fabric out in a fab fruit themed collection called Retro Orchard. I saw it and I knew that it would be the one I picked to make the cushion out of for the giveaway so snapped up two fat quarters straight away.

The giveaway was really popular – aimed at my page getting 300 likes. I’d been busy beavering away making more cushion covers before I noticed it had gone way over 300 so I decided to keep the competition open for a little while longer till that evening to give me some time to finish off my work and concentrate on compiling a list of entries and drawing a winner before Springwatch came on and I had my ‘Me and Chris Packham’ time.

A lovely winner was chosen and she is now happily enjoying cushiony things with it. Then this morning whilst having a little look at my blog stats I noticed that someone had visited my page via the Dashwood Studio blog… I curiously clicked on the link and was so pleased to see that they had been doing a little round up of blogs who had been making things using the new Retro Orchard collection and there was my cushion! So I did a little dance in my chair and have had a big grin on my face for about an hour.

Image

Why not check out the page – see some of the other lovely things people have been making! I ended up making a couple more of them which are in the shop here.

I didn’t do a vast amount of crafty stuff last week as I was busy with my other job – doing genealogy research. Today I plan to crack on with a few more bolster cushions. I have a load of fabric waiting to be transformed, and had spent a bit of time sitting with my creative consultant (aka husband) holding up crochet lace ribbon, velvet ribbon, rick rack etc up to the fabrics to get his opinion on what worked well with what. Sometimes you just need another set of eyes to take a look!

My plan to not order any more fabric for a while ended up going a bit awry when I saw that Plush Addict had a 20% off sale on Kona Solids until midnight tonight. So I picked up some more bits and pieces mainly for making up a pair of cushions where I have only just got one in stock as well as a couple of new ideas. But this is definitely the last one for a while!


Hold onto your hats – here comes a tutorial!

Say what??? Yes, me, doing a tutorial!

Yesterday I sat looking through my stash of ribbon and trim to think of what bits might go better with some fabric combinations I have for making some more rectangular bolster cushions. I’ve mainly been making a whole host of square ones lately while I was waiting for my last fabric order to arrive. (Last one for a while – sad.) Having found some great matching Kona solids to go with some bits I had that I thought would be good candidates I started on one as I knew I would be using the same colour green thread that was still in my sewing machine from having recently made another lime green cushion cover for a repeat customer.

As I started to measure the fabric out I thought to myself – Alex – you should take some photos while you go and providing it doesn’t turn into a shambles – you should do a tutorial on your blog about it. (Apart from the cat, I tend to be on my own most of the day so talking to myself is a pretty frequent occurrence.)

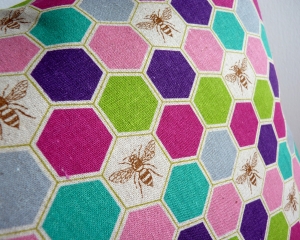
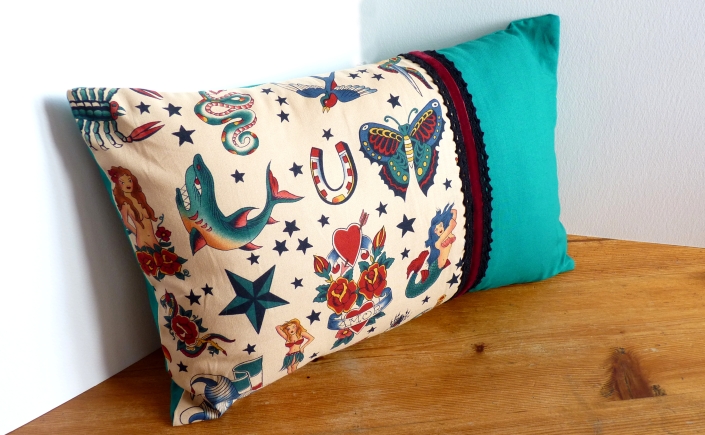
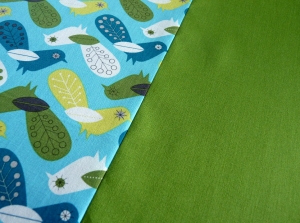
So here we go – I’ve had a fat quarter of this lovely Robert Kaufman Bermuda Birds fabric designed by Suzy Ultman as part of the Critter Community collection, for some time now. I had cut into it a few times to cut out some of the bird shapes as I made some padded keyrings out of them last year. But I found that the Kona Grass Green shade went perfectly with the green birds in the design and I knew I had plenty left over from a recent fabric order in order to make two cushions out of.

BirdsGreen

This tutorial is for making an envelope style cover to fit a 12″ x 18″ cushion pad. My pads are a bit more like 12″ x 17″ so I ended up sewing mine a little shorter at the ends so it didn’t look baggy! I made two of these at the same time so if you also want to make two – just double up on everything. Isn’t it always nice to have a matching pair?

The general rule is that if you are doing a cushion cover you want to cut out the fabric to the size of the cushion pad so that when is sewn up it is slightly smaller and therefore allows the cushion to be plump, rather than just sitting inside a pretty looking sack.

First of all measure out your fabric. For my bolster cushions I like to use a patterned fabric on one half of the front with a matching solid shade on the other half, with that same shade for the back. Depending on the pattern you choose you could decide to have more of that showing on the front or less, it’s totally up to you. As the birds pattern repeat is largish I wanted to make sure that I had a decent amount of it on the front to show it and be a feature, so I decided to allow 10 inches in length for this with some extra to allow for sewing it to the green fabric – usually about half an inch extra and 12 inches wide. And then cut out an 8 and a half inch long piece of the green for the front – 12 inches wide. For the back pieces you will need to allow for the full front measurement of the finished item (18″ long) and about 4/5inches extra to allow for the overlap closure. For mine I went with 4 inches – so in total 22″ long and 12″ wide- you will then want to cut this in half width ways.

If you are swishy you can use a cutting mat, a rotary cutter and have nice lovely straight lines. If you are like me, with a rotary cutter blade that decides to loosen every time you use it, then you might just opt to measure with tape and a ruler and mark out with tailors chalk and cut with fabric scissors!

Bird Cushion Tutorial 1

I then iron out all my pieces. I usually don’t put any water in my iron as we have really hard water here and using the steamer on it just gets it clogged with limescale and then that gets fired out all over stuff, so I have a nice thin duster that I always use – I soak it in cold water from the tap and wring it out and lay it over the fabric and give it a quick once over with the hot iron. I then take the duster off and go over with the iron again. It works a treat. I always iron both sides of my fabric – but if you are using a fabric that might not cope too well with this – then don’t!

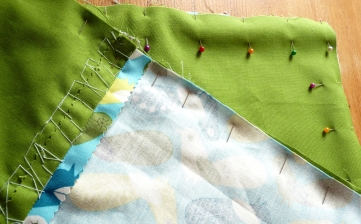
Once ironed I pin up my hems for the back piece. I usually do half inch – fold once – iron, fold again, iron again and pin. I then also pin up my front pieces right sides facing ready to sew together. (Don’t forget that I am making two cushions here so there are four back pieces but if you are just making one then you will just have two!)

Bird Cushion Tutorial 2

Next it is time to sew the hems for the back pieces. I usually line mine up to the 15 (5/8) mark on my sewing machine seam guide as this is the perfect width. Then I put them to one side for later.

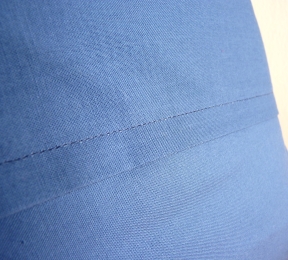
Then I sew up my front pieces having measured and put a line onto the back of the fabric and ironed a crease down it to be sure I am following a straight line with that extra half inch. Once done I press the seam flat front and back and then I am ready to pin on the trim I have chosen ready to hand sew it on.

Bird Cushion Tutorial 5Bird Cushion Tutorial 3

I decided on this lovely pale duck egg blue colour crochet lace ribbon by Tilda and picked a pale blue thread that wouldn’t show up to delicately sew it on – making sure I did stitches along each edge and the middle at regular intervals to make sure there were no bits that were unsecured and could get caught on things. I sat and watched some TV while I did this. You may choose to continue to sit at your designated sewing table, you may wish to do it sitting in bed. You might wish you hadn’t started but once it is done you will be pleased.

Bird Cushion Tutorial 4

So now that the front and back pieces have been all sewn up ready, it is time to pin them together right sides facing. I tend to check the hems of my back pieces to see which one looks the neatest and lay the best one down first as this will be the one you will see when it is finished.

Bird Cushion Tutorial 6

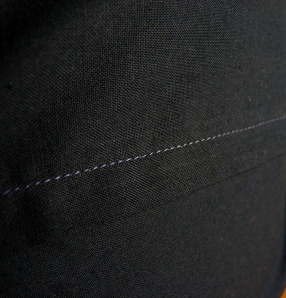
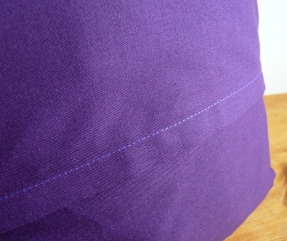
I then sew all the way round with a straight stitch – make sure the stitch length isn’t too small or your fabric will pucker, too long and you might get gaps in your seam which nobody wants. Make sure you backstitch at the end to keep the seam secure. I often go for the seam allowance measurement 20 (8/8) or 15 (5/8) on my sewing machine guide, for this one I went with 15. Once the seam is sewn I then do a zig-zag stitch down each edge stopping just short of the corners, securing each end with some straight stitch backstitch. This is to strengthen the seam, it is called serging. If you have a nice fancy machine like an overlocker you can overlock the edge, but if you are like me and don’t have all mod cons, then a zig-zag is fine. I then use pinking shears to trim the corners off – make sure you don’t cut through your stitches or you will be swearing and probably crying (if by some chance you do this, then you will need to re-sew.) Then trim away the excess fabric with the pinking shears to further protect the fabric as pinked edges fray less.

Bird Cushion Tutorial 7

Next the iron comes out again and I press it all while it is still inside out, and then turn it the right way out making sure I poke the corners out well so they look properly pointy and iron again. You will no doubt get bits of fabric fluff all over the place from the trimmed edges so use a good lint roller to get it off and voilà! You’re done – ready to put your cushion pad in and start doing cushion type things with it!

Bird Cushion Tutorial 8

I do enjoy it when it’s all done and I see the finished article, I like it when I know I’ve picked some good combinations of patterns, solids and embellishments and it all comes together to be something rather nice! So why not give it a go!

So the end result is now in my Etsy shop here.  (Both of them.)

Bermuda Bird Cushion 4

Sweet Treats and Robots

Last week, after having had a bit of a cushion making marathon I decided that it had been too long since I had last made a cake. In order to rectify this I whipped up a nice quick lime drizzle cake.

Nice and moist (especially after having been liberally drizzled in the lovely lime syrup) it is quite a nice light summery type of cake.

The recipe I used was:

Pre-heat oven to 180C (Fan 160) – grease and line a rectangular (or in my case grease a square silicone) baking tray

175g self raising flour

175g golden caster sugar

1 teaspoon baking powder

Zest of two limes

2 eggs

6 tablespoons milk

100g soft unsalted butter

Mix together all the ingredients and beat until it is a smooth dropping consistency. Pour into the baking tray and smooth the top. Put in the oven for 30 – 40 minutes until it is golden and firm to the touch.

Mix together a further 100g of caster sugar with the juice from the two limes (and any other zest you can get off them) and drizzle liberally and evenly over the still hot cake. Once cool, cut up and it will keep for a few days in an airtight container, or just put into your facehole immediately.

Now – about those robots…

One of the awesome cushions I made last week using a great design from Kokka. They have a nice blue/grey background and I teamed this one up with a nice dark indigo on the back.

Grey Robots 1Grey Robots 5

Available in the shop here.

I also had another custom order for a coordinating cushion to go with the owl cushions I sold a while back – this lovely customer had previously bought two cushion covers and had asked for three plain green ones to match – two small darker green and one larger lime green. She decided last week that she wanted one more large lime green one. It is always nice to get repeat custom, it certainly helps with boosting confidence in my abilities!

Danielle Lime Cushion Cover

Although last week was a bit stressful as I ended up blowing a 6th bulb on my sewing machine in the space of just over a month. That last one lasted all of about half an hour after having replaced the 5th one that burnt out, then as I turned the dial to switch from straight stitch to a zig-zag stitch for some serging (without having a posh overlocker machine) – pow – it went. Not burnt out this time, the tiny filament had broken on one side, so was presumably just very fragile and sensitive to vibration. So after a phone call to my Dad, an ex-engineer we’ve concluded that I need to do two things – 1. get a surge protector to use with my machine and 2. try an LED bulb. So just need to find a good reputable seller that isn’t too expensive and get me an LED bulb – he steered me clear of eBay where I have bought my replacement bulbs recently, just because you never know about the quality of electrical type products on there. So fingers crossed that this is the end of me sewing in the dark!

Falling in love with fabric

Recently I have worked with some really gorgeous fabrics. Usually I order a small amount to begin with, I like to see what the fabric is like, often find a plain colour that might match up well with it to make the back of a cushion. Plus you never know how popular (or indeed unpopular) certain fabrics might be. Nothing worse than buying a whole load of something only to find you can’t sell it. (OK so there probably are a multitude of things worse than that…) I love the feeling of anticipation waiting for the fabric to arrive and then once the package is opened I have been known to stroke the fabric for a while. I like hunting down new patterns, finding things I haven’t come across before.

Last week I got some really lovely ones – this one called Water-boat-men by Kobayashi which I teamed up with a green that was the same colour as the lily pads – Ivy by Kona.

Lily 3 Lily 4

This one – Trefle by Kokka – I decided on a blue that matched perfectly with the blue of the birds for the back of the cushion for this fabric – Cadet by Kona.

Nordic Birds 3Nordic Birds 5

And this fabulous Echino Bee by Kokka. I have previously used a green/yellow/blue version of this fabric that I teamed up with a great clover green, for this one I decided to go with a dark hibiscus purple by Kona to match.

Purple Bee 3Purple Bee 5

I tend to only buy patterns that I like, I’m not one for going with the trend, buying the same kinds of fabrics that other people might have seen being used by other crafters. I enjoy being a bit different, being bold and vibrant and appealing. I like to share what I like with my followers, my potential customers.

It is dangerous though, I keep falling in love with these fabrics and then want them all over my home!

The cushions made are now in the shop – and there is 20% off this weekend until midnight on Sunday with the code FUDGEFACE20 if you fancy something nice!


Matching Colours!

Last week my Kona Colour Card arrived. I’d had a bit of a faff with trying to get one. Initially I had ordered one from one fabric shop only to be told the next day that it was out of stock and I got a refund. I then spent that morning hunting down another (they are like gold dust in the UK) and found one shop who agreed to sell me one for £15 including recorded delivery – so I went for that hoping to get it the next day but paid just after the lady had done her post run – but later that day got an email to say that actually they didn’t have one to sell me after all! But as I really needed one soon she offered to give me her slightly older one that was still in good condition for half the price – so I went for that. So it’s not as nice and swishy as the one I was hoping for and it isn’t the latest one with all 271 colours – but it’s better than nothing and for £7.50 I can’t really complain!

So rather than this:

Image

I got this:

Image

I think I’ll survive!

It enabled me to find two greens to match up with the green in the pattern from two cushion covers I sold the other week where the customer wanted two small cushion covers and one large one to coordinate.

ImageImage

It also helped me to pick the right shade of orange to pick up on the orange in this awesome robot print Kokka fabric. This cushion is in the shop here.

ImageImage

I was also finally able to find the right sort of browny grey shade to match up to the colour of the branch in this bird print fabric to make the cushion I’ve been waiting to make for a while – ordering browns that were too brown and getting frustrated! In the shop here.

ImageImage

I also fell in love with this Kokka Echino bee fabric and found a nice lush clover green to go with it. I made two of these – in the shop here.

ImageImage

And also this faux patchwork Kokka fabric – I teamed it up with a nice rich plum colour. In the shop here.

ImageImage

The brown I had bought before thinking it might match the bird print I ended up putting it together with this great brown and yellow forest print fabric – in the shop here.

ImageImage

And I used a green I had bought before thinking it would match the green in the bee fabric but it was too light – but found it worked really well with an owl print Kokka fabric I had. So I used it to make two matching rectangular cushions with a lace ribbon embellishment. Quite nice and summery – in the shop here.

ImageImage

And I’ve also done a couple without having to colour match – a really nice bright coloured spot fabric as a wraparound style – in the shop here.

ImageImage

And I had an order from a good friend (and repeat customer) for some cushions for her son’s bedroom – due to head off tomorrow.

ImageImage

It’s also been a bit of a weird week. Over the Bank Holiday Weekend I wasn’t feeling particularly well and generally a bit run down. (My husband bought me two lovely bunches of roses to try and cheer me up.) My sewing machine (The Beast) has also been misbehaving somewhat. After getting two new replacement bulbs last week another one has blown! Plus the thread tension decided that rather than being quite happy at the usual 4/5 it wanted to be turned right up to 8 before it would play nicely. Plus some thread it just really doesn’t like and snaps it very frequently. So along with all of that I have also burnt my hand on the iron and my thumb on the very hot sewing machine bulb – it is a bit longer than my old one so if I am rethreading the needle I sometimes catch myself on it!

However I did get out and about as on Wednesday night my husband and I went out to Bath to see the comedian Miles Jupp. We had a nice meal out before the show just up the road from the comedy club (and had a 25% off voucher so even more of a bonus!) So it was nice to have a laugh and a bit of a different evening to usual!

So now heading into another weekend and looking forward to spending time with my husband!

More Slightly Odd Gifts

Following on from yesterday’s Mini People post – last year when my good friend from work had to go into hospital I knew she was feeling quite anxious about it.

I decided to make her a little set of things to help cheer her up while she recovered from surgery, she would have to be off work for two weeks so although it wouldn’t be something that would keep her occupied that entire time, I thought that a few silly things might just take the edge off a bit.

Firstly I made her a silly card – I found a great photo from I think a sewing pattern for making everyone in the family a Spiderman costume. On the front of the card I wrote “My Spidey Sense Tells Me…” and on the inside “…You Are Not Going To Die!” (I must point out that it was a straightforward op with no chance of death!)

Image

I decided to make her two little books – one filled with silly little cartoons (some copied from my favourite web comics and others out of my own head) and another which was a poem I had written which I illustrated again using my cartooning talent (of which I have none – be warned!)

ImageImageImage

These were a mixture of things that made me laugh from sites like Natalie Dee, Poorly Drawn Lines, Married to the Sea and just me.

ImageImage

With both these little books I sewed the binding rather than using staples.

I then painted and drew her a little pebble to keep her company.

Image

 This is Trevor, he likes long walks on the beach and enjoys listening to Acid Jazz.

I also made her a little donkey finger puppet (after having asked her a while before if she could have any animal other than the ones she already has – what would it be – and she said donkey.) And I made her a moustache on a stick. Hours of fun.

Abi Donkey finger puppetAbi Tash

Altogether it looked pretty cool. I did forget one thing though – a jumbo sized Twix but never mind!

Image


Mini People!

One of my many alter-egos is being a consulting contractor in projects. Basically I assist project managers, ensuring they abide by certain methodologies, complete appropriate documentation, report to stakeholders etc.

Last year whilst working for a local firm I made some really great friends who were really encouraging of my creative side, they liked to see what things I had been working on and enjoyed me sending them odd cartoons based on situations at work or weird things people had said.

One of those friends was Abi, she had started in the February and we became firm friends. Similar sense of humour and we had a great laugh. I discovered one day in April that her birthday was the following day and I thought that I should make her something that would make her smile. In UK projects we tend to follow a methodology called PRINCE2 (PRojects IN Controlled ENvironments), something which Abi knows a lot about. Her PRINCE2 manual went everywhere with her. She also often talked about how she loved savoury buffet type food, pork pies, scotch eggs etc. So I thought I would make her something that incorporated some of the things I knew she liked – and so I made a Mini Abi…

ImageImage

I made her using felt for the clothes and accessories, wool for hair (with a ribbon in it) and backed with a funky owl fabric and lightly stuffed. She has her PRINCE2 Manual and a pork pie. They are held on with Velcro so can be removed as required. She absolutely loved it! It remains on her desk and is something she often shows people.

After making Mini Abi, my work colleagues insisted that I make more, so I made this one of one of our project managers – Brian.

ImageImage

As our projects often involved work with the emergency services it seemed fitting to use a fabric with a police car on the back.

I then made one for our head of Testing – Paul. He needed some cheering up. He had been brought in to help give proper structure to the test team and to ensure we had proper test documentation and generally sort things out!

So by day, he was mild mannered Paul, drinking tea and writing test strategies…

Image

But when he hears the distressed call of a project manager he drops his cup of tea (or carefully places it down) – rips off his tie and transforms into Super Test Man!!!

ImageImage

He was backed with some super awesome pac-man fabric for that bit of geek chic.

I then made one for the lovely lady I sat next to – Mel. A rather stylish woman who was a keen swimmer.

ImageImage

Her work attire (complete with fashionable scarf) was attached by a couple of wrap around velcro ties which could then be removed…

Image It’s like something out of Baywatch!

Then finally I thought it was time to make one of me. So this is what I did – with some fab tattoo fabric (as I do rather like tattoos and have one on my back) and with a cunning accessory!

ImageImage

Yes – it’s a Mini Me with an even Minier Me!

She now sits on my kitchen windowsill – overseeing my sewing – along with polka dot pots of felt tip pens, painted pebbles and a yellow glittery sunflower made out of a Costa frappe lid – oh and this little lady I made ages ago!

Image

Squares aren’t the only shape…

I’m all about rectangles at the moment.

Last week I decided to try my hand at rectangular cushion covers. I wanted to make them a little differently to how I had been doing the square ones, by having two different fabrics on the front and perhaps with a little embellishment to make it a bit more interesting.

My first attempt I made with the measurements of the cushion pad in my head. This was a bit of a mistake as I should have really made sure I knew what the proper measurements were BEFORE I started. But you live and learn!

ImageImage

I used some leftover Alexander Henry tattoo design fabric and some teal green Kona Solids fabric for the side and back. I then used a nice crimson red velvet ribbon with some black crochet style lace ribbon either side of it for a vintage style embellishment. After I had pressed it I realised just how small it was and how it wouldn’t fit my very plump 12″ x 18″ pad I had (which was more like 13″ x 19″) I ended up getting a 12″ x 16″ pad and just about crammed it in!

My second – and much more well thought through attempt I used a great piece of Kokka fabric I had from a purple fabric stack from FabricHQ I’d had for a while trying to think how best I could use it. I teamed it up with the lovely Mustard Bella Solids fabric I had used before with my grey and yellow triangle print cushions as I thought it really picked up on the hint of yellow in the design. I used a delicate cream ribbon to go down the seam – all neatly hand sewn. I REALLY love this one!

Image

I then did a red Nordic/Scandinavian style one using a leftover piece I had of this lovely bird/chick and tree pattern. I have previously made some mini Christmas stockings out of this fabric, but teamed it up with a nice dark cherry red plain cotton which I had picked up as an end of bolt for a good price and then put a nice retro bit of red rick rack on it for detail.

Image

Then I went back to squareland with a really amazing Alexander Henry industry city print – Smokestack. I did this just with a plain black cotton fabric back. It is kind of art deco feel to the design. My husband really likes this one.

Image

A couple of days before I had also made this one using some Lotta Jansdotter design fabric. It reminds me of pebbles. It is backed with a teal blue/green fabric to match the colour on the front.

Image

And then at the end of last week I had an order for two owl & snail print cushion covers. These are made using Robert Kaufman Bermuda fabric. I now have only got enough to make three more. They are backed with a nice fine green stripe fabric – Road 15 – Road Rain. So they went off and were received today and had a lovely message from the happy customer to let me know they had arrived and asking if I would be interested in making two smaller plain green cushion covers to match – and of course I said yes!

Image

I had also decided at the weekend to get a colour card for the Kona Solid’s fabrics. There are 271 shades to chose from and as I often order them to go with certain designs to do the plain backs for cushions but it can be a pain when you are trying to match a colour based on what you can see on a computer screen. I don’t have any remotely decent fabric shops near me so I rely on online shops to get the best and most interesting fabrics. I’ve been disappointed at times when a fabric arrives and it’s not quite right, so I decided to order one – they are a bit hard to find in the UK and only a few shops sell them.

I had found one at Plush Addict for a great price of £9.25 and had ordered it along with some other fabrics but had a call this morning from them to say they were sadly out of stock and they had been waiting weeks for them to come in, so I got a refund. I then hunted down other UK sellers and found one who only had one left and asked them what they could offer it to me for. I got a good deal for £15 including recorded delivery from GKS Fabrics. I’m really looking forward to it arriving, I think it is really going to help! It will also help me to pick out a good green to match either the lime green or the darker green in the owl fabric for my customer if the two green fabrics I have already aren’t a good match. Each page is A4 sized and uses swatches of the fabric rather than a printed version of the colour. It seems a bit pricey but when you weigh up the cost of ordering fabric that turns out not to be the right shade you need and the disappointment and time wasted in then having to find the right one – I think it will be worth it!

Image

Eeeeee excited! (Image from http://www.fatquartershop.com)

Although I have been getting rather irked with the sewing machine – aka The Beast this past week, lots of thread snapping and then had to change the bulb only for the new one to go a few days later – so two more bulbs are on their way to me, so at the moment my sewing is only being done when it is a sunny day! Either that or get my husband to stand over me holding a torch… But other than sewing in the dark, it’s all back to normal now after a bit of tinkering!

Warning – Another Cushion Related Post!

It has been 21 days since my last post about cushions so I figure it is OK to do another one.

I made some more great cushion covers over the past few weeks. A while back I made some yellow and grey triangle ones using the great fabric – Stamped by Ellen Luckett Baker. Initially I had thought I would keep them to go on our sofa at home but then I found the blue/green version of the fabric and totally fell for that one as it goes really well with the colour of the feature wall in our living room, so I made a couple of cushion covers out of that (and a couple more to go in the shop.) The yellow and grey version ones are now listed on Etsy.

ImageImageImage


Image

Now taking pride of place on the sofa – you can just about make out the wall in the background!

I also found this really great geometric print fabric. It feels a bit like silk but it is cotton. Backed with a cotton / linen mix navy fabric.

ImageImageImage

And then tried out this newsprint collage print by Windham fabrics. In my mind the purple background colour was more solid but when it arrived I saw it was more streaky – so it gives it more of a punky type feel. This one is a one fabric wraparound envelope style.

ImageImage

The next one was another same fabric wraparound style in a Michael Miller fabric.

ImageImage

Then I saw this great deer print fabric and found a plain teal kona solids fabric to match.

ImageImageImage

The final cushion I made using some fabric I had originally bought to use to make a cover for a pillow to make a bed for Sam our rescue cat we got in February. However, he came with his own blanket from his old home, and these days he prefers to sleep either on our bed, on the sofa or on a jute shopping bag, so I thought I would use it for cushion covers instead. I teamed it up with an Essex Linens solid colour fabric in Ruby – again something I had bought to go with something else – a fabric that had a sort of pinky red colour in part of the design but I found the Ruby was actually more orangey than pinky and it went perfectly with the Catnap fabric I had. So it was back to the drawing board to find another fabric for my other project! I think it is tricky when you are buying fabric online when you can’t be 100% sure on whether the colour will match something else, but as I don’t have any decent fabric shops near me I have to rely on buying online. I am tempted to get a Kona Solids colour card to use for when I want to find the right colour for some of the plain backings.

ImageImageImage

This week I am planning something a little different – some rectangular cushion covers – but using two or three different fabrics on the front and perhaps some ribbon detail. I will be taking a look at what fabric remnants I have and what ribbons that might work well together. I might even try some appliqué! (Steady now Alex!)